In this article, currency designer Michael Berman touches on his background in the coin design world and explores the use of ProImage’s Arziro software – to design coinage.
I’ve been in the coin design world for about 18 years, beginning as a coin designer at a private mint in the Seattle area, with zero knowledge about the coin design process or how coins were made. Coming from a print design background, I quickly learned that print rules did not apply; I was now dealing with a physical product which had very physical limitations.
Five years later, new opportunities had me moving back to Southern California, where I began freelancing coin design. While I enjoy designing different kinds of coins, medals, tokens, collectibles etc., it’s foreign currency and its design that I love the most.
ProImage – a producer of secure document design software for banknotes, passports, tax stamps, and secure ID cards – contacted me, curious to know if their Arziro software could be used for designing coins as well, specifically currency coinage.
By pure happenstance, the next day I received a new coin currency design project. I immediately had an opportunity to see how far I can push coin design with secure document design technology.
The first and most important piece of information that had to be established with the mint was the minimum possible line width and strike-able detail. Once established, I quickly realized that many of the tools were indeed usable.
The following are just a few of the Arziro tools and techniques that I have taken from the world of secure document design and incorporated into coinage currency and the world of die struck coins.
Multiply: While you may not see a ‘pure’ Multiply effect featured, it is the foundation or launching point to create many of the complex effects of the other tools. Arziro tools, such as the Line Raster, Select Raster, and Trafo Raster, utilize existing shapes, patterns, and textures. I create those patterns via the multiply tool. It could be a simple series of lines or a grid of squares, but it’s the tools inside of these tools that make this so integral.
Line Raster: We have all seen coins that have tight line patterns in the background. They may be radiating lines from the center, vertical or horizontal stripes, or perhaps wave lines. While they create lovely texture and lower rejection rates in production, usage of the Line Raster tool can take these simple textures and patterns to another level..png)
The tool utilizes a series of lines and creates an image by undulating the width in relation to a source image. I like to use this to create subtle background images. My example in the image above subtly contains a silhouette of an elephant’s head at the 12 o’clock position if you look closely.
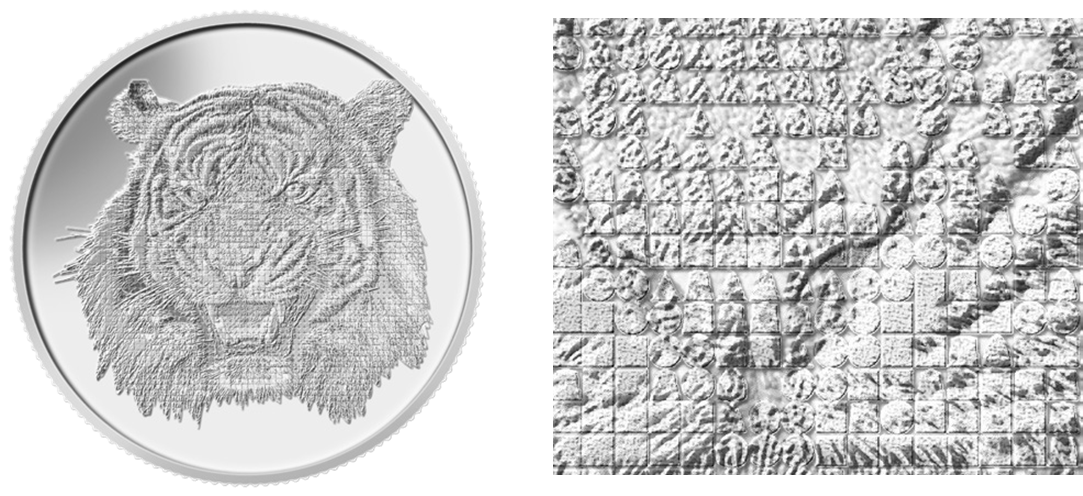
Select Raster: The Select Raster Tool is an interesting and tricky tool to use in coin design, but when used correctly, it can generate a complex and striking effect. It begins with a grid, and once created, you select a series of colours (I use grayscale for coin work) and create a series of shapes.
Using a reference image of choice, the select raster tool will take said image and populate the grid with the shapes and colors you chose. This results in the recreation of your reference image made out of your predetermined vector shapes and colors. In coin terms, black being raised and white being ‘the table of the coin’, the final results create a complex depth map of an anti-forgery image.
.jpg)
 Reference Image Select Raster Image Close up of Image
 From there, I place the ‘map’ on top of the original reference image. Once on top, I use the map to break the image into the tiny pieces of the select raster. Couple this with the variations in height (determined by the shades of gray) and the results are a perfectly legible image that is made out of hundreds of undulating individual shapes.
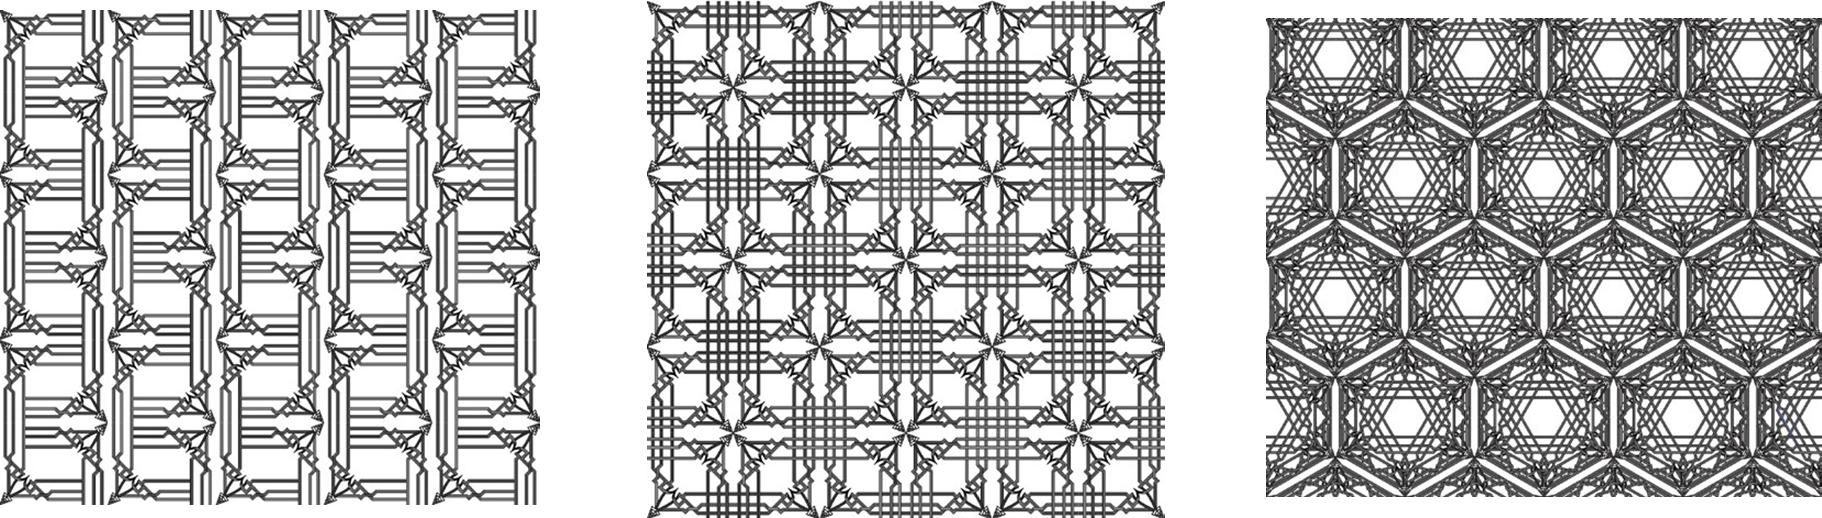
Crystal Patterns: This tool can be used with mathematical precision or played with on a quest to simply make something look cool. To oversimplify how it works, it takes what you have drawn (usually a line pattern) and it rotates, flips, and mirrors it in a variety of ways – 16 ways to be exact.
The tool also allows you to adjust the grid parameters in which the tool functions. I primarily use it to create complex crystal (tessellation) patterns to fill background space, and it is useful in activating negative space or adding a visual break in texture.
I also use the tool in a slightly unintended way. I create a pattern fill and from there extract a portion of the pattern fill and create a pattern brush. This allows me to take a complex crystal pattern and have it flow around shapes as I desire. An easy example would be creating a vector circle close to the rim of a coin. You can then apply the brush pattern derived from the pattern fill and it will flow around the circle. If the pattern is dense enough, you can incise your text for a visually dynamic element in your design. Below are three unique complex patterns created with the exact same ‘seed’ element.
.png)
Line / Object Generator: I find this to be a tool of subtlety. The tool takes a line or object and creates a repeat pattern out of it, and then strategically changes the angle or direction of that pattern. The results create an ‘is that there?’ effect.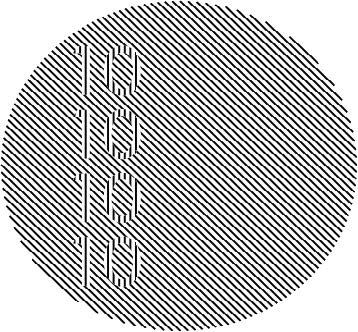
As discussed with previous tools, I like to use this one in line and pattern textures in discreet, seemingly uninteresting places on a coin. That is where I like to tuck in a little reversing of the pattern. It might be a denomination, a symbol, or the name of the country for whom the currency is for. I look at this technique twofold; it makes it harder to counterfeit the coinage, and only the astute viewer of the coin will notice it.
Guilloche Generator: At the risk of stating the obvious, the Guilloche Generator creates intricate guilloche patterns. Most US banknotes feature these kinds of patterns on their outer edges, but you do not really see these patterns used in the world of coinage._wRxjHqz.png)
I have been working to change this in my designs lately, learning to view guilloche patterns as dynamic shapes. When looked at ‘creatively’, you can see the shapes that make up the shape. Some shapes are positive, and some are negative. I have used the different shapes supplied by the creation of the guilloche pattern to act as holding devices or frames for other elements, and also using the positive and negative shapes to help create more visual depth by weaving elements in and out of the guilloche pattern – all the while the guilloche pattern itself is serving as a difficult to recreate anti-counterfeiting element.
The six techniques listed here are design elements that I have incorporated into my coinage currency designs. They have been discussed and approved by some of the minting facilities I work with. And there are others that are actively being discussed, using Arziro tools such as the Trafo Raster, Numismatic, Quick Background, and Blend Tools.
Between the designers, engineers, R&D specialists, and creative teams, we will continue to push the boundaries of what can be done both technically and artistically. The next time you’re handed change to place in your pocket, take a moment to examine and appreciate the phenomenally intricate art piece comfortably nestled in the very palm of your own hand.